Monday 24 May 2021
Glue or solder?
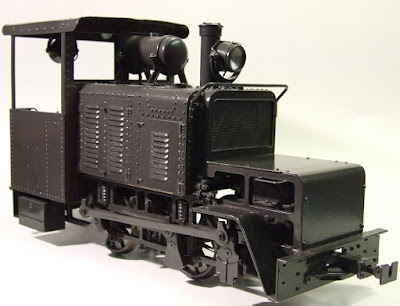
Solder, engineering bolts and glue are essential to our Wrightscale models.
There are a variety of ways in which an item can be fixed and so what follows is a series of recommendations, in short, how Malcolm likes to build his locomotives.. We’ll leave the problems of soldering live steam for another blog, and concentrate on the Baldwin Gas mechanical.
The BGM model chassis is built on a flat surface – a sort of jig if you like. The front and back buffer beams have to be fixed to the side frames ie the basic ‘box’ of the locomotive. The assembly should be checked for ‘squareness’ of course. Malcolm uses a metal square, to check that each corner is a right angle as you secure the frames with the nuts and bolts. As a final check, make sure that the diagonals are equal which they will be if the rectangle is a true one.
Then it is time for the solder. As the frames are made from laser cut steel, a high-melt solder could be used, but, unlike with live-steam construction, low-melt solder can be used throughout.
Low-melt or soft solder has a melting point below 400 degrees Celsius (752 Fahrenheit) and is normally used with a flux. Flux cleans the surfaces of the metal so that the solder can bind and ensures even flow of the molten metal. Modern lead-free solder melts at 250 degrees Celsius.
These solders must be reinforced with something else, hence the nuts and bolts. Low melt soldered joints have comparatively little tensile strength. On the other hand, the solder runs neatly along the joint and is generally unobtrusive and well-behaved, though do make sure that any surplus flux is cleaned away. If something has gone wrong, you can melt the solder, clean carefully and start again.
If the assembly is square and true, the axle boxes can be slipped into place make sure that you have a smooth running fit. For this, engineering glue, usually Loctite, is used. Now fit the axles and wheels.
You should have a smooth, running chassis.
Soldering the next part is no longer an option, otherwise your existing joins will fall apart when heated. Loctite glue has the advantage of not needing heat. At the same time, it and other glues need respect and understanding.
Soldering flux removes any films of corrosion or grease; glues on the other hand depend on careful preparation beforehand. Clean well! Another important point, glue tends to flow everywhere. Care is needed, a little at a time only! Unlike soldering, Loctite needs an hour at room temperature to harden – ‘curing’ in the jargon.
If you have second thoughts, the Loctite bond can be broken with heat, so check before it is too late. To rephrase the old proverb, check three times, glue once!
Loctite is also recommended to set the motion. Once again, respect the nature of Loctite. The leading crank has to be set first and left to cure. If all is well then tackle the other side. When both sides are running properly, pinning (with 10BA bolts) can take place. With the wheels and connecting rods in place, the locomotive begins to take on its true character.
At this point, the cosmetic gearbox is added, plus the drive shaft. There is a lot of white metal, some of it for show but concealing working parts in brass. The white-metal parts are fixed together before mounting. As these parts are assembled ‘off-line’ so to speak, most parts are soldered, with the occasional dab of superglue. For obvious reasons, it is important that the solder is low melt or the white metal itself would begin to liquefy. The same considerations about pre-cleaning, flux and after-care apply as above.
The alternative is epoxy resin. Malcolm is not very fond of epoxy. It is true that soldering seems a bit of a faff, especially if you do not have a selection of soldering irons and other devices. On the other hand, proper use of epoxy resin is harder work than you might think.
To produce the desired polymer, it must be pre-mixed and the right amount of hardener/curative added, an important ingredient allowing resistance, durability etc. Once this curative is added to the mix, it heats up. No heat, no reaction, no polymer!
Most epoxy resin kits on sale to the public only contain a small amount of curative. Rather than going to the bother of adding the recommended amount and mixing, mixing, mixing, people add curative to excess. Surprise, surprise, the stingy allowance in the tube is soon used up. Many customers resort to purloining someone else’s tube, so if you buy an popular Epoxy Resin kit from a large retailer, check that the product still has its little tube of curative.
Alternatively, use low-melt solder!
The electrical system needs specialist electrical solder. Epoxy resin will NOT do here as it is a polymer with high electrical resistance! The circuit is wired up ‘off-line’ so have no fear of melting the metal. Once assembled the electrics and gears are bolted into place and transmit drive to the axles through the jack shaft. If this has been assembled properly, all will be well.
The basic cab structure is assembled separately using slot-and-tab construction originally designed by David Sharp of Modern Outline Kits. Nickel-steel etched plates are folded up. These plates are all numbered on the ‘waste’ side of the etch. Do not cut out components until they are needed; otherwise you end up with a pile of USOs – unidentifiable sharp objects. After detaching a piece and before working it, draw a file over the underside edges which otherwise might give you a nasty cut. Wearing fine gloves may also help.
The fold-lines are all indicated on the underside of the etch. When Malcolm has to make a right angle, he adapts his vice into a forming tool with two 15mm (6”) lengths of square 18mm ( ¾ “) angle. He lines up the fold-line, tightens the vice and then bends with care.
The cab roof is gently curved and needs a different forming tool. Malcolm recommends a cloth folded up to form a generous pad. He also recommends practising on scrap brass or nickel silver before attacking the etch!
As long as this done neatly, the plates can tabbed into each other and soldered. Low melt solder will do – even super-glue.
Saturday 1 May 2021
Proud owners of a 16mm Baldwin Gas Mechanical
There are things we believe to be beautiful, things we know to be useful and another category of precious stuff. These are our playthings.
Don’t be misled by a word rooted in ‘play’. These ‘toys’ have stimulated curiosity, companionship, competition and rivalry. They bind together the events and processes of the world. They are prized objects which encapsulate a personal or national history. A model of a Baldwin Gas Mechanical, also known as a petrol locotractor, brings together two chapters of human history. Every knobble and bump tells a story. The battered prototype in this picture has many tales to tell. If you want to create new stories, you can run it on your layout. Otherwise you can keep it on display.
The Baldwin Gas Mechanical model is not beautiful in the conventional sense. It was made for running on a 32mm gauge layout with other models and with other Sixteen Millers. The model is accompanied by challenge, fun and companionship. We have been called the playful animal. Cubs and calves put off childish things when they enter the adult world; we don’t ever, quite.
Running a model on a layout is fun. It also brings back a lost world, a world of conflict in the case of Baldwin Gas Mechanical. (First World War 1914-18) Once the war had ended, the BGM was repurposed for a world in flux. Beneath the fun, we are looking at a tribute and memorial.
The original design for the Baldwin Gas Mechanical was created in 1916 during the 1914-18 War. In 1914, instead of a rapid invasion of Paris or Berlin, the combatants dug in along the Western Front. On each side of the Front, a million or so soldiers faced each other. The quantity of food, water ammunition etc required was mind-boggling. Given the technology of the time, the most practical means of transport was the portable railway with specially designed Prime Movers and wagons. Back in the 1880s, Prosper Péchot had devised a 60cm gauge system for the French Army. In 1888, the Péchot system was copied by the Germans and much developed.
The steam locomotives used in the 19th century soon proved unsuitable for trench war-fare, puffing out highly visible clouds of smoke in daylight and showers of sparks at night. Railway design rapidly looked to petrol power, electric and even, in a German locomotive, to diesel. Although the Eastern Front never had lengthy and extensive trench warfare, some narrow gauge petrol powered locomotives were needed.
The USA was a power-house of internal combustion engines. The mighty Baldwin Locomotive Works of Philadelphia, for instance, was relatively close to the thriving motor industries of Detroit. In 1916, some petrol-powered ‘locotractors’ were delivered to Russia. Soon after, the French Army ordered their own ‘locotracteurs’ to a slightly different design and to 60cm gauge, 600 units in all. The Wrightscale model seen above and below has used this design.
In April 1917, the USA entered the War. Among their first military orders were 126 Baldwin locotractors, known as Baldwin Gas Mechanicals, to the French design, and a further 65 more compact BGMs. The British never placed an order during the war but a very celebrated BGM made its way to Britain after the War. See below.
Sadly we know of no surviving examples of the Russian design but a number of locotractors – Baldwin Gas Mechanicals – have survived. After 1919, surviving locomotives and rolling stock were sold off, to quarries, agricultural concerns such as sugar beet producers and manufacturers eg beet refineries. A celebrated BGM survives on the Ffestiniog preserved railway. It was originally acquired in the 1920s when the railway served slate quarries. It was re-engineered in the 1950s and given the name Moelwyn to celebrate the mountain Moelwyn Mawr, site of many quarries.
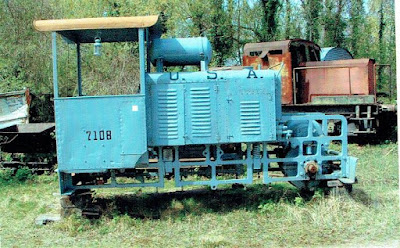
The BGM in our first photograph was snapped by Malcolm at Tacots des lacs circa 2000. It was originally a US locomotive; you can tell, not just from the ‘U.S.A.’ painted on the side, but also the number 7108. Baldwin supplied 126 locotractors to this design to the AEF, numbered 7001 to 7126. The locomotive has had a hard life, losing its wheels and running gear as well as its chimney and lamps.
Tacots des lacs (lakeside jalopies) was created by enthusiasts in flooded and abandoned sand workings. At the time, they had rescued a lot of 60cm gauge material as well as the BGM pictured – on the understanding that they were restored.
In case you were asking, the battered locomotive standing behind is possibly a mash-up of locomotive parts. Eric Fresné describes just a chimera. Its lower part consisted of a steam chassis upon which was built a diesel loco.
Malcolm fell in love with the locomotive preserved at Froissy, seen in a photo taken in the 1990s. Delivered by Baldwin to the French Army, it had already been lovingly restored to museum quality. It has long been designated a Monument de France.
For the reasons given above, he realised straightaway that a model would be a fine addition to a 16mm scale layout and he has been making them for roughly thirty years. The historians Stuart Baker, Eric Fresné, Dr Christian Cénac and Rich Dunn all have a soft spot for this piece of military hardware.
See Richard Dunn ‘Narrow Gauge To No Man’s Land – US Army 60cm railways of the First World War in France’ Benchmark Press
Eric Fresné ‘70 years of sugar beet railways in France’ LR Presse see especially page 103
Sarah Wright ‘Tracks To The Trenches’ Birse Press
For images of Moelwyn search www.festipedia.org.uk
Subscribe to:
Posts (Atom)


